Consignment Prep: Tagging

I signed up for my first C3 Children’s Consignment sale 6 years ago.  I loved the idea that I could clean out stuff my kiddos were done with, make a little money, and support local charities with part of my profits!

I love shopping at the consignment sale too.  I get great deals and I’m supporting the local charities and other families.  One thing I don’t love, is when the tags have damaged items I’ve bought.  In the last 6 years of buying and selling I’ve got a few tips to share about making sure your tags stay on your items and don’t damage them!

Before I start tagging, I make sure to have these supplies ready:

  • string
  • hole punch
  • safety pins or tagging gun
  • packing tape
  • washi tape or blue painters tape
  • plastic sacks, I use zip lock and bread bag style
  • scissors

Books

The book section often makes me want to cry.  I love books.  I always want more books.  However, when they’re taped round with packing tape I start having a panic attack.  Last year I saw some awesome ways to bundle up and tag books without the drama of packing tape!

  • String:  My favorite go to.  It has me humming that song from the sound of music.  Punch two holes in your tag and slide it on the string before you knot it up.  Add a bow for fun, not function.
  • Plastic bags: bag your books and tape to the plastic, not the books.
  • Washi tape:  Tape your tags on with washi tape.  This removable tape will not damage the book when the tag is removed.
  • Blue painters tape:  I’ve not tried this, but the logic is sound.  This tape is much easier to remove than packing tape.

Clothing

Somewhere along the line it was decided that when you put clothing on a hanger for a consignment sale, the hook of the hanger goes left when the front of the garment is facing you.  It helps to have all clothing going the same direction.  It helps with how you place your tags so they are visible if everyone is doing it the same way.

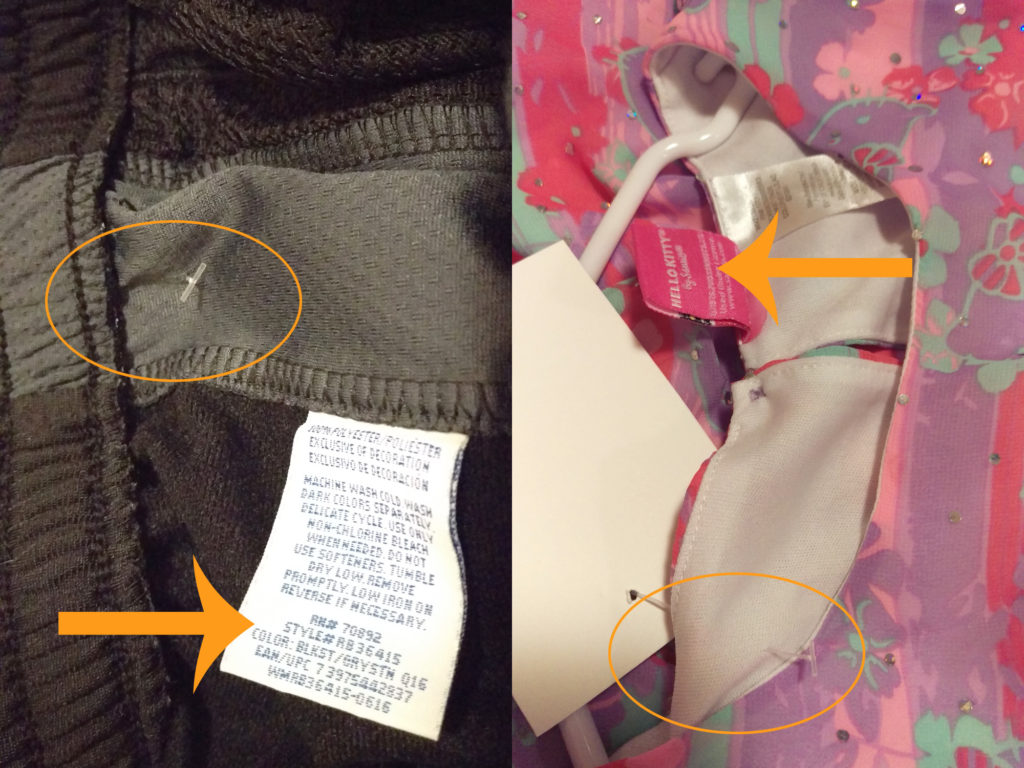
At the C3 sale, they received so many customer complaints about purchasing items with holes from tagging guns, clothing found with holes from tagging guns will be returned to the seller and may be debited from the sellers total sales.  If you have a tagging gun, please be extra thoughtful about where you place the tag; even if you have one with a ‘small’ needle.

If there’s a practical tag already on the clothing, use it!  I’ve brought home more items that had me asking “Why?!” than I’d care to admit.  Why would you add a hole to a perfectly good article of clothing when another option is right there?  Please, put your tags on tags when available.

tagged through clothing when another tag is present

Sometimes it’s not so straight forward.  Those tag-less shirts are everywhere.  Baby onesies, sleepers, and overalls have hard to reach or tags in impractical places for adding a consignment sale tag.

Onesies & shirts usually have a seam right near the neck that the store uses to put their tags on.  Add your tag to the same spot.  If there’s not a seam near the neck, look around the front of the collar.  If you can’t find a good place to stick the needle of your gun, use a safety pin.

Rompers and poloshirts have great seams to stick tags into.

Sleepers usually have all the seams surged down or finished so they are hard to get your tagging gun around.  Fortunately if there’s a snap at the top, there’s a reinforcement strip that we can add a tag to!

sleeper tag placementThe manufacture’s tag in overalls is usually right behind the front of the bib, which is a terrible place to put a tag for a consignment sale.  Bring out the hole punch an string and tie your tag to the hardware for the straps.

overalls with tag on strap hardwareWhat about outfits with accessories, or brand new items still in the bag?  One outfit had a pair of matching tights.  I stuck them in a bag, shoved the bag through the hanger hook, and taped the bag to the hanger.  this one didn’t have a great spot for a tag either, so I tied a tag through the button hole.
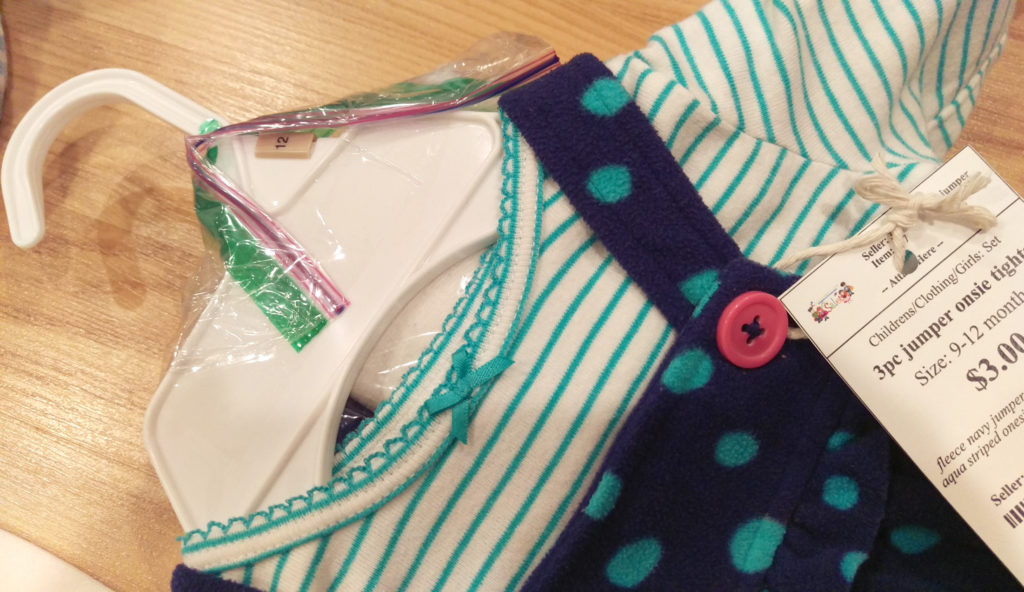
I can’t possibly list all scenarios here, but my point is please take a moment to be thoughtful about where you are placing your tags so they do not damage the fabulous items you are trying to sell!

A year in cloth diapers!

We’ve passed several amazing milestones this year, a dozen years of marriage, a decade in our house, and a year in cloth diapers!

A year after tentatively buying 2 JSB pocket diapers from, Buckwheat Bottoms, we’re still doing it!  I don’t have cold hard numbers for you on money we have saved.  I do know I’ve tried to stick to spending less than what we would have been spending on paper diapers each month as I update and expand my diaper library.

Little in a Rainbow Brite fitted diaperAlong the way I’ve made some discoveries.  My daughter is what’s known as a ‘heavy wetter’ in the cloth diaper world.  I love the simplicity of using a trifolded prefold in a cover.  I don’t love pockets as much as I thought I would.  I do love natural fibers, cotton and bamboo are my friends.  I put off trying wool, but wool is cool!  It’s so amazing, and washing it every 1-2 weeks or when it gets dirty is NBD.  Fitted diapers with a wool cover are awesome for night time.

Around December my big baby decided to grow.  When she was 1 she weighed 27 pounds and was 31.5″ tall.  At her 18 month check up in December she clocked in at 33 pounds and 34″ tall.  Many of our pocket diapers started to fit poorly, or were too small.  The snaps on my favorite Rumparooz covers sprang open.  I found myself floundering, searching for styles that fit my daughters body and her active nature.  Cotton Babies had large FuzziBunz Perfect Size Diapers and Bummis Super Snap covers on clearance so I ordered some to try.  Large FuzziBunz diapers are large.  They sort of fit, but not well, they were a little too big.  They came with 1 microfiber insert and they don’t absorb fast enough for my ‘heavy wetter’ daughter.  When I added an extra insert, it helped with the absorption, but then they became bulky.

Little in her Rainbow Brite dress and fitted diaperI broke down and tried some BumGenius 4.0 diapers.  For some reason I was trying to ‘buck the trend’ of the popular BG diapers.  Susan at Buckwheat Bottoms had some pre-owned options in her store so I bought a few to try out.  Where the JSB pocket diapers were too small, the BG gave her nice room above her thighs so she could still move freely.  The BG 4.0 diapers still fit my Little.

Around February I came to the realization that I needed more absorbent material than the average cloth diaper uses.  When I realized that I needed to ad an extra insert to everything that works for the average child I felt like I wasn’t floundering quite as much.  The covers stopped leaking and I didn’t have to change the bedding as much!    The type of absorption mattered too.  Microfiber didn’t absorb fast enough for us.  I started using cotton inserts and put my stack of flour sacks to use.  I could fold the flour sacks to fit into many different covers/pockets/styles.  I’m not sure why it took me so long to make the realization that we needed natural absorbent fibers and more of them, but there it is.

Little taking a nap in our loaner wool longiesOur diaper stash started shifting.  I acquired more GroVia shells.  We use their organic cotton snap in soaker pads inserts with their organic cotton boosters.  The boosters don’t seem like much but they make all the difference in the world for us!  I fold down the top a little and stick them inside the soaker pads.  They stay put and make diaper changes faster.  These trim diapers fit my daughter well.  They don’t get in the way of her active nature.  We are still using our GroVia diapers.  I also picked up 2 more Flip trainers.  They work for us if I have two inserts in them.

Little showing off her big jumps in her BottomBumperI bought my first ‘fancy’ fitted.  I had a few plain ones.  A couple workhorse terry Popolini ones I’d bought preowned, and some Bumboos I bought on the baby steals site.  I was ready to try what everyone in the cloth diaper group was talking about; Wool and Fitted diapers!  I had some wool.  A friend is lending us her awesome longies but I was chicken to use them over night.  I bought a wool wrap, but it was too small to use over our night time configuration.  It wasn’t until I found the XL Loveybums at Buckwheat bottoms that I had some big enough for our night time solution.  When I started using wool covers at night it was amazing.  My girl’s night time diapers are something else.  I often sing that Sir Mix-a-Lot song when I see her in her night time diaper.  A prefold wrapped around a cotton insert laid in a popolini fitted wrapped in wool.  That lasts about 4 hours or so.  Neither one of my kiddos likes being wet at night.  Doesn’t matter if it is a paper diaper or cloth.  They get angry and start kicking, and nobody sleeps once they start kicking!   I put her in one night time configuration when she goes to sleep, change her when I get in bed around 10/11 and that lasts through the night, most of the time.  In the last month she’s started holding her pee better at night.

I bought a large RagaBabe All in One from a local woman in April.  Not counting wool, it’s the most expensive diaper I own and I love it.  It has hook and loop closure which sometimes irritates me, but I’m glad I bought the diaper.  It still fits my girl, and I know it will hold and not leak.  If we weren’t so close to potty learning, I’d buy more.

Little taking a break at the park in her Bottom BumperI also bought two Large snap Bottom Bumpers from Buckwheat Bottoms in April; they rock!  When I added the extra insert, they were perfect for us.  They have an amazingly narrow crotch area.  Their design is trim and they fit my big girl awesomely.  I thought I was a snap only girl but I bought some Large Aplix (hook and loop) diapers on clearance and they are awesome too.  I love the easy of putting on an Aplix diaper instead of fiddling with snaps.

In May I purchased a custom Rainbow Brite diaper from Happy Little Llama.  Such a sweet side snapping fitted that my little loves wearing with the Rainbow Brite dress we happily stumbled upon.  Another mama had bought the dress for her daughter, but it was too big.  It fits Little perfectly!  Paired with a Loveybum pull on cover it is a winning combination.

In June I snagged some XL side snapping Clover fitted diapers that someone had traded in at Buckwheat Bottoms.  Paired with a tri-folded prefold, they are our new go to night time solution.  Their design is unique, they have what looks like a pocket with snaps inside, but it’s not a pocket.  It’s a way to adjust the button hole elastic on the inside; sweet!  I was waffling about buying both of them.  So glad I was able to decide quickly to buy both of them.  Sadly, you can no longer buy them new.

My current quest is to find cute pull on wool for my girl.  If it’s not soft and brightly colored she has no interest in wearing it.  My Little is currently 34 pounds and nearly 37″ tall.  She has a 20″ waist and 12″ thighs.  It is a challenge to find trim fitted diapers to go with the cute wool.  I’m trying my hand at sewing some that will hopefully fit her perfectly under her new to us size 3 Sustainablebabyish underwoolies!

3 30 foot clothes lines!It’s been an adventure trying cloth diapers.  My husband was not on board when I started.  He used to frequently make negative comments about cloth and search for a paper diaper if he needed to change a diaper.  He hasn’t said anything, but little things tell me he’s coming around.  He no longer tells me how much the diapers stink when I put them in the washer to wash them.  One time we were traveling I only packed paper diapers and our daughter’s diaper leaked after her first pee that evening, thankfully I had put down one of those pads anticipating that.  He said “There’s a cloth diaper in the car, should I go get it?”  It was so sweet.  He even installed an amazing clothes line for me between our porch and garage.

Cloth isn’t for everyone, but I’m really glad I tried it out.  Sometimes it seems overwhelming with all the different options, but options are good.  No two babies are the same.  As my baby grew and changed different diapers fit her better.  It’s been a fun adventure figuring out what works best for us.  I’ve met a ton of amazing local mommas who cloth diaper.  I’ll bet there’s a local Facebook group for cloth diapering mommas in your neck of the woods too!  You should check it out.

Why I started cloth diapering

I can’t remember when I started thinking I would like to try cloth diapers.  I have a marvelous way of over thinking and never doing.  My friend added me to a cloth diaper group on Facebook in April.  In early June I was visiting my sister and we were hanging out one night.  I was doing a fantastic job talking about cloth diapers.  We covered prefolds, fitteds, all in ones, and why I thought pockets would work best for my baby who doesn’t lay still for diaper changes.  (I still hadn’t tried cloth yet.)  I started musing and crunching numbers while we were talking.  We go through 10 diapers a day.  My daughter is a pee machine, she likes to poop as soon as I change her, and I have an OCD like tendency to change her diapers as soon as they are wet.  Everyday I was taking a plastic grocery sack full of diapers out to the garbage can.  It is $0.25 for each size 5 Kirkland diaper.  That is $2.50 a day, $75 a month, $912.5 a year that we spend on diapers.

My first cloth diaper purchase, 2 Just Simply Baby Pocket diapers!Later that week, Buckwheat Bottoms, a local mom run cloth diaper store, ran a special on Just Simply Baby pocket diapers.  I bought two.  If I used one cloth diaper a day it would be paid for in 40 days.  And I figured if I only used one a day then I could avoid washing poopy diapers.  Even though I flush the solid poop from paper diapers, I don’t put any effort to scraping the smooshed stuff out.  I was confident I could do my experiment and pay for my two diapers.  I challenged myself to put Lil’ in at least one cloth diaper a day for a month.

Then something unexpected happened.  Well, not totally unexpected, but it caught me off guard.  After I changed my daughter into her first clean cloth diaper, she pooped; right away.  Remember what I said?  Yes, she prefers to poop in a clean diaper.  Figures!  As I cleaned that poopy diaper in the toilette, sometimes thinking ‘I am going to be sick’ and other times thinking ‘this isn’t so bad,’ it occurred to me that ‘I can do this.’

I went back to Buckwheat Bottoms and bought two more pocket diapers.  I was nervous about my long term commitment, but excited and confident that I would continue my month long challenge of using at least one cloth diaper a day.  I found something to wash everyday so I could clean my diapers and have them ready for the next day of use.

I started this crazy endeavor on June 18.  I passed my monthly challenge with flying colors.  I celebrated by purchasing 6 gently used Rumparooz and two Kissa Pocket Trainers.  I even splurged on a Flip Trainer.  A friend brought over some of her stash for me to use until her little grows into it which has given me a chance to try different pockets, covers, and fitteds.  At the beginning of this month, JSB ran an overstock special and I picked up 3 more diapers with inserts for a super deal.  August 5th Lil’ spent the whole day in cloth.  I used one paper diaper as her second night time diaper.  I’ve continued using cloth all day with one paper diaper at night.  Last night I put her in cloth as her second night time diaper.  It’s been over 24 hours since I put her in a paper diaper.  I wonder how long I can keep her going in cloth.

I have spent $200 on cloth diapers.  If I can go two and a half months without using paper, I’ll have paid for my current cloth diaper purchases.  My daughter will be in diapers for at least that much longer.  (I should have kept better track of how often I have used the diapers since I started.)  When Lil’ is potty trained, I can sell my diapers or donate them to a mom who cannot afford to buy diapers.

Why did I start cloth diapering?  It’s something I wanted to try.  They are super cute.  I feel good not throwing away a bag of diapers everyday.  I’m going to save money.  But most of all, I can do this!

Fabric Bunting!

I was wondering if I would have the energy to make fabric bunting for my Little’s first birthday.  I started cruising through Etsy to see if I could find some that I wanted to buy.  I found several floral, vintage themed ones I wanted to buy.  The more I looked, the more I wanted, the more I knew I had to make some.  For the price of two I could make 5 longer banners with larger flags.  I was blessed with a friend who brought her bunting by.  I immediately hung them in my living room for inspiration.  They made me smile every time I looked at them.  Thank you friend!

I remembered reading on Joy’s Hope about her vintage sheet supplier.  I fell in love with the beautiful vintage floral prints.  My Grandmother had several of the sheets listed.  Desire got the best of me and I ordered more than I needed to make 5 banners plus a flat floral sheet to use for a table cloth!

Vintage sheet fat quarters

After cutting several pieces of paper in different dimensions, mulling it over with my sister, and staring at the bunting hanging in my front window, I finally cut 80 triangles, 9″ tall with a base of 8″.  The stack was beautiful and impressive!

80 8" wide 9" tall triangles from vintage sheets

Sewing them right side together in pairs went quickly.  When it came time to turn them I began to doubt myself.  They were not looking right.  Should I have sewn them wrong sides together and been done with it like this tutorial?  I turned a couple and was frustrated trying to iron them flat.  I made sure I was clipping my acute corner correctly.  I thought about it for at least a day.  Then the answer hit me.  I needed something to shove inside my sewn triangles so I could iron them well.  I cut a cardboard triangle from a cereal box to use.  It worked like a dream.  I could press forward with my creation.

cardboard triangle

I stitched around the edge of my triangles to add a special finished touch.

finished flags, ready for banner

All the fabric bunting I saw used double fold biased tape, like this one.  I’ve always loved grosgrain so I bought some when it was 50% off at Hobby Lobby and used it.  I only had enough to finish 4 banners.  I might try the biased tape on my last one and see how that looks.

my finished bunting

My sister hung the bunting for the party.  I wish I had taken pictures of her climbing the tree and up on her husband’s shoulders!

The party

Happy Birthday Little Girl.  I can’t believe you are one.  We love you!

Lil in front of the bunting

Fabric Party Hats

Fabric Party HatsLil’s first birthday is quickly approaching.  She puts everything in her mouth.  I wanted her to have a party hat she could chew on and I wouldn’t have to fish pieces of it from her mouth. I found a few tutorials for sewing fabric party hats.  One used interfacing, and the other used a serger.  I have a lowly Minimatic that is as old as I am.  I used the pattern from Jane of all Trades, and made my own mash of directions.

  1. I made a cereal box template from the Jane of all Trades pattern so I could sew these for everyone at the party if I acquire more Wonder Under and get some crazy burst of energy.
  2. Using the template, cut Wonder Under & reclaimed blue jeans to the pattern size.
  3. After ironing the Wonder Under to the wrong side of your top fabric, cut it out.
  4. You should only have 2 pieces now.  Put the right sides together.
  5. Pin the elastic where it was marked on the pattern.
    Pin Elastic
  6. Stitch nearly 1/2″ around the curved edge.  Back stitch over the elastic to make sure it’s secure.
  7. Remove the paper from the Wonder Under.  Otherwise you will be cursing as you try and pull the little papers from along the seam you snipped.
  8. Snip along the curved edge.  Every 1/2″ will do.  I tend to get a little carried away and snip more frequently.
  9. Turn your wrong sides together.
  10. Press according to the Wonder Under directions.  Damp cloth, 10 seconds, iron to dry it a bit.  Try not to iron the elastic.
  11. Make a cute ribbon pom for the top.
    ribbon pom
  12. Fold the hat in half with the outside fabric facing in.
  13. Place the pom in the tip of the hat, pointing toward the curved edge, upside down, pin.
    pom placement
  14. Stitch up the straight side.  Make sure to sew the pom in well.
    stitching up the hat, secure pom
  15. Turn the hat right side out and admire your handy work.  Press the seam to one side.  Give yourself lots of praise for how cute it turned out.
  16. Find your little and try it on them.  Tie a knot in the elastic because even though you measured it, it’s still too long.
    Lil in fabric party hat

These could be embellished and made super cute for an older crowd; think fuzzy boa stuff!  I’m keeping it simple for the 1 year old.  I’m still keeping my eye out for some cute ribbon to add detail along the bottom of the hat, but it’s pretty darn cute even without it.

blackout curtains

Nearly a year ago when it started getting nice out it was getting harder and harder to get our son to sleep.  We went on a search for kid’s blackout curtains.  We found some at Target, but they were not exactly what we were looking for.  I shopped JoAnn’s for fabric and didn’t find anything I liked until near the end of the summer.  I purchased the fabric and then found the perfect tutorial for making blackout tab top curtains!  The fabric has set in my closet in a bag since then; until today.  I’m washing the fabric, measuring the windows, and reading the instructions over and over again so I can finally get the curtains ready for this summer.

I purchased the fabric before I had a pattern, measured the windows, or knew exactly what I wanted to do.  I bought plenty of the cute leaf pattern for the curtains, but I only bought 2 yards of the cute contrasting owls.  I thought the owls would be too much as curtains.  My son loved the owls as soon as he saw them.  He was much more interested in them than the leaves.  I can’t blame him, they really are cute.  I figured JoAnn would be all sold out since nearly a year has past since I first purchased the fabric.  I called the store before I drove out there.  They still had the owl fabric, enough for me to make curtains and have some to play with!

scissors cutting fabricI was intimidated by the many long straight cuts I’d have to make to piece together the panels.  I found a technique that worked great for me.  We have laminate flooring so I cleared and cleaned a large area to work on.  I folded the fabric where I would need to cut.  I carefully measured the length of the fold and pinned it in place.  Then I pulled my scissors through keeping everything as even as possible.  It worked great!

I still need to finish the panel for the other window.  All the pieces are cut and the right color thread is in the machine.  I keep hoping I’ll get an energy boost before baby sister gets here.

Comfortable Pants

My little man has the scrawniest waist.  He’s three, 40 inches tall, and his waist is only 18 inches.  Finding pants that fit him is hard.  I snagged two shirts my husband was going to get rid of to turn into some soft pants for him.  I thought I could make a pattern from an existing pair of pants, but I had trouble with that.

Pattern on shirt fabricI used Butterick pattern B5510 Large and modified the pattern for pant D.  I cut out the large size, leaving extra length to the bottom of the pattern paper.  Then I took in the width, 1.5″ at the waist and 1.25″ at the cuff.  I was able to fit the pattern in the body of the shirt and use the existing hem for the cuffs; yea for less sewing!  Since I didn’t need to hem the pants, I lined up the bottom of the XL length on the pattern with the shirt hem.  Then I mostly followed the pattern directions.  I left out the elastic around the cuffs and the stripes down the side.

My son was excited to try on his new soft pants.  I am excited to move several pair of 24 month pants out of rotation; they were much too short!

Craft paint + toddler = success

Painting with craft paintMy son has been noticing paint brushes; on TV, on signs, and outside the local art Gallery.  We had a couple yucky days this week.  After reading a post from Ashley Ann, I felt brave enough to take the plunge.  I covered the kitchen table with an old shower curtain and got my box of paints out.  I told him he could pick 3 colors.  To my delight he chose the primary colors.  He was a natural at dual wielding paint brushes.  He had so much fun.  He asked to paint again when he woke up from his nap; so we did.

16 grains of rice

16 grains of riceThis is what 16 grains of rice looks like.  It doesn’t sound like much until you say, “When he blew his nose, 16 grains of rice came out.”  Then it sounds like more; especially when the “he” is your 2 year old.  It was one of those too quiet moments when I became suspicious and checked on my little man to find him quietly sitting at his rice table, pushing rice up is nose.  There was no doubt what he’d been doing, “Rice up nose” he said.  After I told him “we don’t put rice up our nose” I had him blow his nose.  Thankfully he is a good nose blower.  After a couple more sneezes and nose blows, I counted 16 grains of rice.  I almost took a picture of the tissue to post, but then I got grossed out.  So, here is a representation of the 16 grains of rice that my son stuffed up his nose.

Carseat Love

7 months in new carseatWhen my son was 6 months old, it became obvious that his infant carseat was not going to last until he was a year old.  I began searching for a convertible carseat.  The Alpha Omega Elite from Costco seemed to be a super bargain.  We brought one home and then tried to install it.  It was way to big for us to use rear facing in our cars.  I started searching for a seat that would work in our Outback and allow me to ride shotgun without my knees crammed into the dash.

I started reading more and more about carseats and why children should remain rear facing as long as possible; it’s safer!  I found the perfect post on the  car-seat.org forum.  The Maxi-Cosi Priori was the perfect carseat for us and Target had them in stock, but it was more money than we had originally intended to spend on a carseat.  When we got to Target I pulled all the covers off the carseats to expose their shell and foam.  Carseats all have to pass the same tests, but they are not all created equal.  It was an eye opener.  I pointed out, “We wouldn’t have a problem spending $200 on a laptop that was going to last us 2-4 years.  Isn’t his safety worth at least that much?”

When we got the seat home it was amazing.  It came with push button LATCH clips which made installation a breeze.  It had a base that flipped so that no pool noodles or rolled up towels were needed to reach the correct incline.  To top it off, my son smiled when we strapped him in.

Over the last year and a half, I’ve watched him grow to fill more and more of the seat.  The top of his head is getting close to being within the limit of 1 inch from the top.   I know we’ll have to turn him around soon, or get a bigger car with a bigger carseat.  I feel lucky that I found the car-seat.org forums and have been able to keep my son rear facing as long as we have.  Even thought I’m not currently in the market for a carseat, I’ve put the carseatblog on my regular reading list.  I hope that others will find the information at car-safety.org as helpful and informative as I have.